


Tutorial to upload large file to Amazon S3 Glacier using AWS CLI
- Vaibhav Deshpande
- Sep 3, 2022
- 4 min read

Updated: Feb 7, 2024
Learning Objectives:
Learn to create an Amazon S3 Glacier vault .
Learn to upload a large file using AWS CLI.
Step 1:
We will using AWS Cloud9 EC2 development environment. To know how to create Cloud9 IDE visit our Cloud9 IDE tutorial.
In a terminal session in the AWS Cloud9 IDE, Run the yum update (for Amazon Linux) command to help ensure the latest security updates and bug fixes are installed.
For Amazon Linux:
sudo yum -y update

Step 2:
Create an Amazon S3 Glacier vault
Create a vault with the create-vault command.
All S3 Glacier commands require an account ID parameter.
The hyphen character in the below command is to be replaced with your accountid.
aws glacier create-vault --account-id - --vault-name myvault
Your output should be similar to one shown below except your account-id.

Step 3:
Prepare a file for uploading
Let’screate a file for the test upload. The following commands create a file named largefile that contains exactly 3 MiB of random data.
dd if=/dev/urandom of=largefile bs=3145728 count=1
Below is the output.

dd is a utility that copies a number of bytes from an input file to an output file. The previous example uses the system device file /dev/urandom as a source of random data.
Next, split the file into 1 MiB (1,048,576 byte) chunks.
split -b 1048576 --verbose largefile chunk
Below is the output.

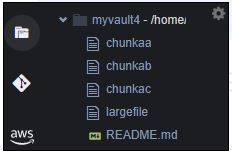
You can also see this files on your left side of panel
Step 4:
Initiate a multipart upload and upload files
In the below command, replace your account id in place of hyphen & then run the command.
aws glacier initiate-multipart-upload --account-id - --archive-description "multipart upload test" --part-size 1048576 --vault-name myvault
Below is the output.

Before we move forward make sure to copy and save this upload id for future use.
upload id: rVh75L6LC3lRKUUvy1W3Ts9lhFji1CRmuSeWPltivE-PXaTztM0iGGQ5ioHb-tCjodWSu0gPWWkrtOpOOIe7mNiJ_tRR
S3 Glacier requires the size of each part in bytes (1 MiB in this example), your vault name, and an account ID to configure the multipart upload. The AWS CLI outputs an upload ID when the operation is complete. Save the upload ID to a shell variable for later use.
UPLOADID="19gaRezEXAMPLES6Ry5YYdqthHOC_kGRCT03L9yetr220UmPtBYKkOssZtLqyFu7sY1_lR7vgFuJV6NtcV5zpsJ"
Next, use the upload-multipart-part command to upload each of the three parts.
Replace account-id in place of ‘-‘ hyphen. Also replace upload id in palce of “$UPLOAD”
Note:
Use notepad for editing following command make sure that command is in single line
aws glacier upload-multipart-part --upload-id $UPLOADID --body chunkaa --range 'bytes 0-1048575/*' --account-id - --vault-name myvault

aws glacier upload-multipart-part --upload-id $UPLOADID --body chunkab --range 'bytes 1048576-2097151/*' --account-id - --vault-name myvault

aws glacier upload-multipart-part --upload-id $UPLOADID --body chunkac --range 'bytes 2097152-3145727/*' --account-id - --vault-name myvault

Step 5:
Complete the upload
Amazon S3 Glacier requires a tree hash of the original file to confirm that all of the uploaded pieces reached AWS intact.
To calculate a tree hash, you must split the file into 1 MiB parts and calculate a binary SHA-256 hash of each piece. Then you split the list of hashes into pairs, combine the two binary hashes in each pair, and take hashes of the results. Repeat this process until there is only one hash left. If there is an odd number of hashes at any level, promote it to the next level without modifying it.
The key to calculating a tree hash correctly when using command line utilities is to store each hash in binary format and convert to hexadecimal only at the last step. Combining or hashing the hexadecimal version of any hash in the tree will cause an incorrect result.
To calculate a tree hash
Split the original file into 1 MiB parts. This we have already done in step 3 above.
Calculate and store the binary SHA-256 hash of each chunk.
openssl dgst -sha256 -binary chunkaa > hash1
openssl dgst -sha256 -binary chunkab > hash2
openssl dgst -sha256 -binary chunkac > hash3


Combine the first two hashes and take the binary hash of the result
cat hash1 hash2 > hash12
openssl dgst -sha256 -binary hash12 > hash12hash
Combine the parent hash of chunks aa and ab with the hash of chunk ac and hash the result, this time outputting hexadecimal. Store the result in a shell variable.
cat hash12hash hash3 > hash123
openssl dgst -sha256 hash123
After running 2nd command you will receive following outcome. Make sure to copy it.

SHA256(hash123)=f49e8a5f5b523cf1d4a8f8b88e9dbd00ca125ef2e770be11461425cecff67fb8
Copy the highlighted part from your console for further use.
And replace with “$TREEHASH”
TREEHASH=f49e8a5f5b523cf1d4a8f8b88e9dbd00ca125ef2e770be11461425cecff67fb8
Finally, complete the upload with the complete-multipart-upload command. This command takes the original file's size in bytes, the final tree hash value in hexadecimal, and your account ID and vault name.
aws glacier complete-multipart-upload --checksum $TREEHASH --archive-size 3145728 --upload-id $UPLOADID --account-id - --vault-name myvault
Below is the output.

Important NOTE:
Copy the “Archive ID” and save it safely. You will need archive id to empty the vault.
Unless we empty the vault you cannot delete the vault.
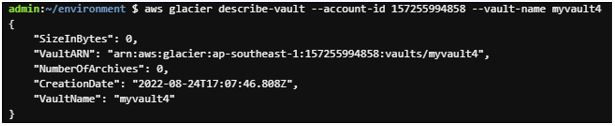
You can also check the status of the vault using the describe-vault command.
aws glacier describe-vault --account-id - --vault-name myvault
Below is the output.
Now it's safe to remove the chunk and hash files that you created.
rm chunk* hash*
after running this command all files are remove

To delete Archive and empty the vault run the following command.
aws glacier delete-archive --vault-name xyz --account-id - --archive-id="*** archiveid ***"
Replace your account id and vault name with “xyz” and paste your archive id here <<archive-id>> that we copy before.
NOTE:
After running commands it won’t show any results it will take 1 day to update vault after that you can delete vault directly from console.
aws glacier delete-vault –-vault-name xyz –account-id -
Delete the vault to avoid any AWS charges
Delete Cloud9 IDE avoid any AWS charges
Was this document helpful? How can we make this document better? Please provide your insights. You can download PDF version for reference.
We provide the best AWS training from Pune, India. For aws certification contact us now.


very informative
Very helpful blog!
Very helpful
Well explained
Nice blog