
AWS EC2 Windows Instance
- Parag
- Sep 17, 2020
- 2 min read

Updated: Sep 27, 2023
Tutorial Blog to launch & connect to a windows instance.
Objective:
Learn to launch and connect to a Windows instance.
Learn to remotely connect to the windows instance
Step 1: Log in to AWS Console and go to EC2 services. On the dashboard, click on Launch Instance.

Step 2: In Name and tags section, type ‘windows-server’ in text field labeled Name.

Step 3: Select Windows under Quick Start to choose Microsoft Windows Server AMI.

Step 4: In the next Choose an InstanceType section, select the t2.micro.

Step 5: : In Key pair (login) section, click on dropdown to select an existing KeyPair. If you haven’t createda key, follow the below steps:
Click on Create a new key pair.
Type Key Pair Name of your choice.For e.g. MyKeyPair.
Now Click on Create key pair. This will download a .pem file. Save this file for future use.
Now click on Launch Instance.

Step 6: In Network settings section, click edit to change the following
Set network subnet
Select security group or create new
Set a subnet for the instance by
Selecting one from the Subnet dropdown menu.

To select security group
Select ‘Create security group’ radio button under Firewall (security group) heading, if you do not have an existing one. This new Security group will be used for allfurther windows server instances.
Type Security group name of your choice. For e.g. ‘Windows-SG’ as shown.
Type Description as ‘Security Group for Windows Server’.
Keep default RDP rule as shown.

Step 7: Let rest all remain as default & Click on Launch instance in the Summary section on the right to launch the instance.

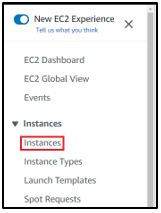
Step 8:Click On Instances at the top left of your page under Instances. You will be redirected to Instances dashboard. Ensure that your windows instance is running.
Now select the instance checkbox and click On Connect. Switch to RDP client and Download Remote Desktop File.

Step 9: Now click on Get Password. In this Get Password window you can Upload private key file which you downloaded in the previous step.
Click On Decrypt Password. You will be provided with the detailsneeded for logging into the Windows Instance.
Copy Password into a file for furthercorrespondence.

Step 10: Now go to the location where your previously downloaded RDP file with following icon is stored.Double click to open the file.

Step 11: Now followthe steps:
In the new pop up window click on Connect.
Now enter the password we stored in Step 10.

Step 12: Congratulation! You have successfully started operating you Windows Instance.
If you no longer need this instance, make sure to terminate the instance.
Was this document helpful? How can we make this document better. Please provide your insights. You can download PDF version for reference.
For your AWS certification needs or AWS learning reach us.

Very helpful !
Easy to understand
it was very easy to understand
Easy understandable tutorial
Good explaination and easy to understand